PART 2: Basic Robot Navigation
Before we can program our robot to fight, there are a few basic robot navigations that we need to familiar with at this stage.
1. Moving Forward And Backward
Step 1: Before we upload the program to your robot, it is a good practice to save all our program files. Go to File > Save As
Step 2: Create a new folder called "Sumo Robot". (you are free to decide where to save the folder)
Step 3: Name the program you want to save as "Basic Navigation".
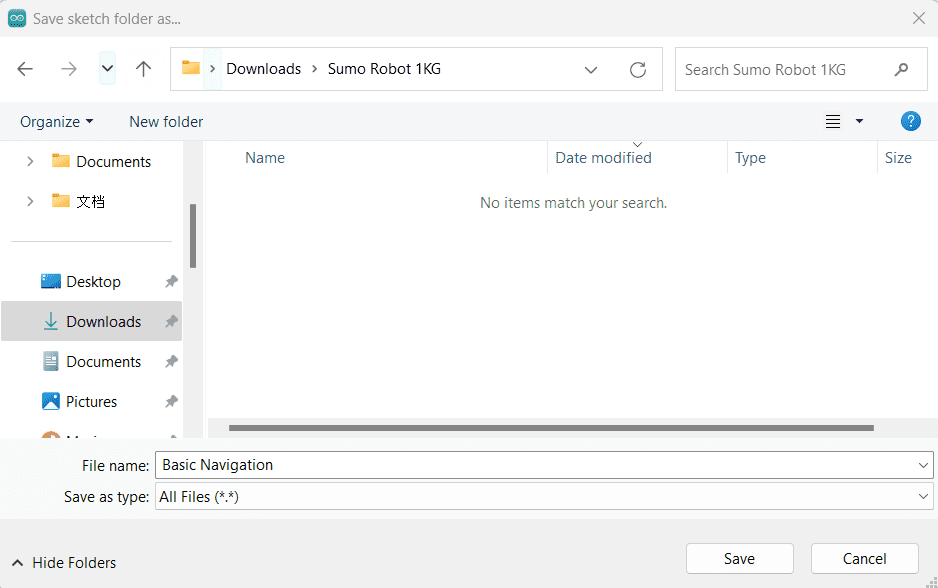
So you have saved your first program as "Basic Navigation" under the folder of "Sumo Robot". When you create your next program later, you can name it anything you want but save it under the same Sumo Robot folder.
Step 4: . Copy & paste this code into your Arduino IDE.
#include "CytronMakerSumo.h"


void setup() {
  MakerSumo.begin();
}


void loop() {
  MakerSumo.setMotorSpeed(MOTOR_L, 50);  // Left motor forward at speed 50.
  MakerSumo.setMotorSpeed(MOTOR_R, 50);  // Right motor forward at speed 50.
  delay(3000);                           // Delay for 3 seconds.

  MakerSumo.setMotorSpeed(MOTOR_L, 0);   // Left motor forward at speed 0 (stop).
  MakerSumo.setMotorSpeed(MOTOR_R, 0);   // Right motor forward at speed 0 (stop).
  delay(1000);                           // Delay for 1 second.

  MakerSumo.setMotorSpeed(MOTOR_L, -50); // Left motor backward at speed 50.
  MakerSumo.setMotorSpeed(MOTOR_R, -50); // Right motor backward at speed 50.
  delay(3000);                           // Delay for 3 seconds.

  MakerSumo.setMotorSpeed(MOTOR_L, 0);   // Left motor forward at speed 0 (stop).
  MakerSumo.setMotorSpeed(MOTOR_R, 0);   // Right motor forward at speed 0 (stop).
  delay(1000);                           // Delay for 1 second.
}
Step 5: Make sure you have connected the USB cable on the PC and your board.
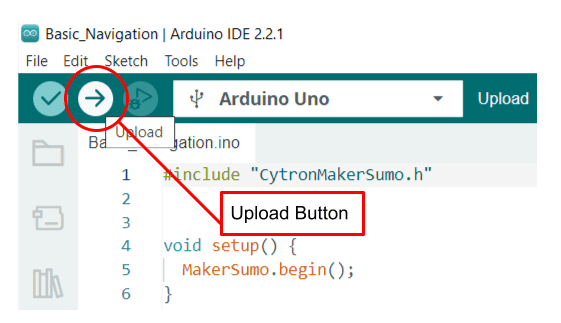
Step 6: Now, you can upload the program to your robot. Click the "upload" button located at the top bar of the Arduino IDE.
You will see "Done uploading" appear at the bottom when it is done.
Step 7: Unplug the USB cable from your robot. Then turn on the power, your robot should be moving forward for 3 seconds before it stops for 1 second then it will move backward for 3 seconds. And it will keep repeating if you don't turn it off.
Step 8: Try to change the speed of your motor to 150 and reduce the delay to 1000. Then upload it to your robot again.
#include "CytronMakerSumo.h"


void setup() {
  MakerSumo.begin();
}


void loop() {
  MakerSumo.setMotorSpeed(MOTOR_L, 150);   // Left motor forward at speed 150.
  MakerSumo.setMotorSpeed(MOTOR_R, 150);   // Right motor forward at speed 150.
  delay(1000);                             // Delay for 1 second.

  MakerSumo.setMotorSpeed(MOTOR_L, 0);     // Left motor forward at speed 0 (stop).
  MakerSumo.setMotorSpeed(MOTOR_R, 0);     // Right motor forward at speed 0 (stop).
  delay(1000);                             // Delay for 1 second.

  MakerSumo.setMotorSpeed(MOTOR_L, -150);  // Left motor backward at speed 150.
  MakerSumo.setMotorSpeed(MOTOR_R, -150);  // Right motor backward at speed 150.
  delay(1000);                             // Delay for 1 second.

  MakerSumo.setMotorSpeed(MOTOR_L, 0);     // Left motor forward at speed 0 (stop).
  MakerSumo.setMotorSpeed(MOTOR_R, 0);     // Right motor forward at speed 0 (stop).
  delay(1000);                             // Delay for 1 second.
}
Step 9: Unplug the USB cable and turn on your robot.
You may notice now that your robot isn't running forward/ backward in a straight line. Don't worry, it is completely normal that your robot is not moving straight or behaves differently.
We will discuss this issue later but we want to bring your attention to these 2 parameters: speed and delay.
From the 2 programs we made earlier, you should realize that in order to change the robot speed, you can change the second value inside function:
MakerSumo.setMotorSpeed(MOTOR_L, 150);
Where 0 is stop, 255 is maximum speed and negative value is reverse.
To control how long you want a certain command to execute, you can change the value in function:
delay(1000);
The delay is in millisecond. 1000 millisecond = 1 second.
Side Note:
Why doesn't my robot moves straight?
There are several reasons led to this problem:
1. The floor or the map is not flat. This will cause one of the wheels not touching the ground and spinning.
2. The mounting of the motors is not straight or not aligned. You can realign the motors by loosening the motor bracket.
3. The weight distribution of the robot does not balance mainly caused by the battery. So you can consider to stick the battery at the center position or add some weight on the motor which the wheel is spinning.
4. The internal resistance of the motor is not consistent so even if you apply the same speed to 2 different motors, they won't be running at the same speed. To solve this problem, you can slightly adjust the speed in your program for an individual motor. E.g.: If your robot always runs toward the right side, you can either reduce the speed of the left motor or increase the speed of the right motor until they are running straight.
MakerSumo.setMotorSpeed(MOTOR_L, 130);
MakerSumo.setMotorSpeed(MOTOR_R, 150);
or
MakerSumo.setMotorSpeed(MOTOR_L, 150);
MakerSumo.setMotorSpeed(MOTOR_R, 180);
2. To Make A Turn
Step 1: Copy and paste the code below to your Arduino IDE, then upload it to your robot.
#include "CytronMakerSumo.h"


void setup() {
  MakerSumo.begin();
}


void loop() {
  // Turn left for 1 second.
  MakerSumo.setMotorSpeed(MOTOR_L, 0);
  MakerSumo.setMotorSpeed(MOTOR_R, 50);
  delay(1000);

  // Stop for 1 second.
  MakerSumo.setMotorSpeed(MOTOR_L, 0);
  MakerSumo.setMotorSpeed(MOTOR_R, 0);
  delay(1000);

  // Turn back to original position.
  MakerSumo.setMotorSpeed(MOTOR_L, 0);
  MakerSumo.setMotorSpeed(MOTOR_R, -50);
  delay(1000);

  // Stop for 1 second.
  MakerSumo.setMotorSpeed(MOTOR_L, 0);
  MakerSumo.setMotorSpeed(MOTOR_R, 0);
  delay(1000);

  // Turn right for 1 second.
  MakerSumo.setMotorSpeed(MOTOR_L, 50);
  MakerSumo.setMotorSpeed(MOTOR_R, 0);
  delay(1000);

  // Stop for 1 second.
  MakerSumo.setMotorSpeed(MOTOR_L, 0);
  MakerSumo.setMotorSpeed(MOTOR_R, 0);
  delay(1000);

  // Turn back to original position.
  MakerSumo.setMotorSpeed(MOTOR_L, -50);
  MakerSumo.setMotorSpeed(MOTOR_R, 0);
  delay(1000);

  // Stop for 1 second.
  MakerSumo.setMotorSpeed(MOTOR_L, 0);
  MakerSumo.setMotorSpeed(MOTOR_R, 0);
  delay(1000);
}
Step 2: Unplug the cable and turn on your robot. Test your robot
3. To Read TheEdgeSensors
Step 1: Go to Arduino IDE. Open an example from File > Examples > Cytron Maker Sumo Library > TestInputs.
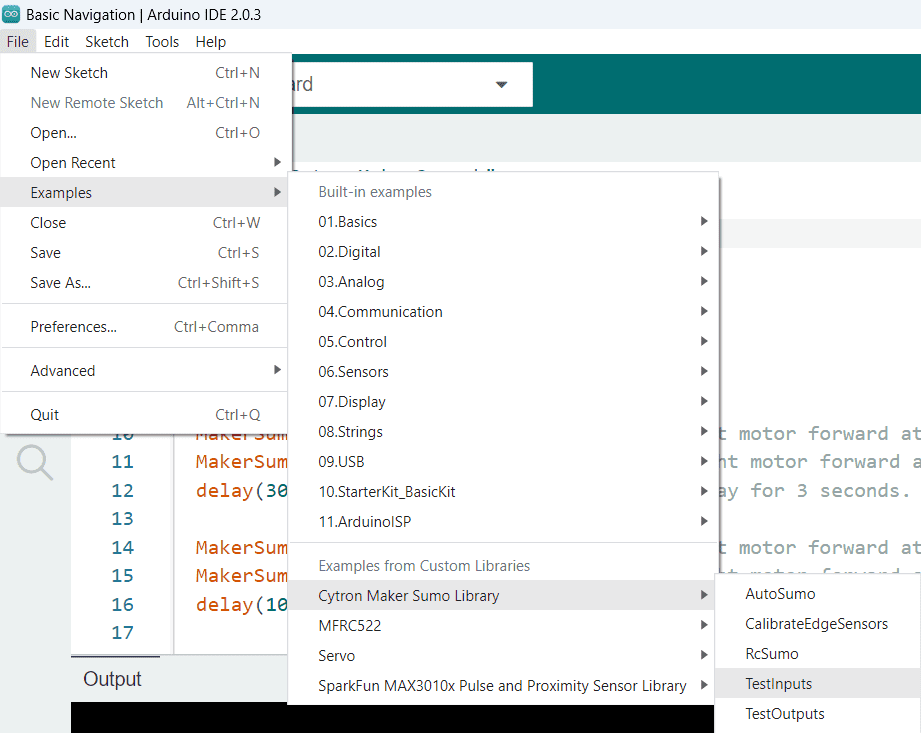
Step 2: Upload the sample program to your robot.
Step 3: Once done uploading, click serial monitor's icon located at the right corner of the top bar.
Step 4: You will see a new window pop up. Change the baud rate to 115200.
Step 5: Then you suppose to see a set of readable data from the serial monitor's window. Observe the reading for EDGE_L and EDGE_R. (for my case it is 449 and 316. Your's might be different)
Step 6: Place the robot's edge sensors on top of the white surface and black surface. Read and record the reading for EDGE_L and EDGE_R. For my case, the reading for white surface is 449 and 316; while the reading for the black surface is 992 and 961.
With these values, we are able to set the threshold for our edge sensors at around 720 and 638. Take the median value for the white and black surface.
So the left edge sensor will recognize a surface as white color when the value is lesser than 720 and vice versa.
Step 7: Copy & paste the codes below to Arduino IDE then upload it to your robot. You need to fill up your own threshold value for EDGE_L and EDGE_R.
#include "CytronMakerSumo.h"


void setup() {
  MakerSumo.begin();
}


void loop() {
  // If both left and right edge sensors are on black surface...
  if ( (analogRead(EDGE_L) > 720) && (analogRead(EDGE_R) > 638) ) {
    // Move forward.
    MakerSumo.setMotorSpeed(MOTOR_L, 50);
    MakerSumo.setMotorSpeed(MOTOR_R, 50);
  }

  // If either one of the edge sensors is on white surface...
  else {
    // Stop for 0.5 second.
    MakerSumo.setMotorSpeed(MOTOR_L, 0);
    MakerSumo.setMotorSpeed(MOTOR_R, 0);
    delay(500);

    // Move backward for 2 seconds.
    MakerSumo.setMotorSpeed(MOTOR_L, -50);
    MakerSumo.setMotorSpeed(MOTOR_R, -50);
    delay(2000);

    // Stop for 1 second.
    MakerSumo.setMotorSpeed(MOTOR_L, 0);
    MakerSumo.setMotorSpeed(MOTOR_R, 0);
    delay(1000);
  }

}
Step 8: Test to run your robot on a black surface with a white line in the middle. (the actual sumo robot ring is black in color and white line at the edge)
Now you know how to read the signals from the edge sensors
4. To Read the Opponent Sensors
Step 1: Copy & paste the codes below to Arduino IDE then upload it to your robot.
#include "CytronMakerSumo.h"


void setup() {
  MakerSumo.begin();
}


void loop() {
  // If object is detected by all 3 opponent sensors...
  if ( (digitalRead(OPP_FL) == LOW) &&
       (digitalRead(OPP_FC) == LOW) &&
       (digitalRead(OPP_FR) == LOW) ) {

    // Move forward at high speed.
    MakerSumo.setMotorSpeed(MOTOR_L, 80);
    MakerSumo.setMotorSpeed(MOTOR_R, 80);
  }

  // If object is not detected...
  else {
    // Move forward at low speed.
    MakerSumo.setMotorSpeed(MOTOR_L, 30);
    MakerSumo.setMotorSpeed(MOTOR_R, 30);
  }

}
Step 2: Test run your robot by placing an object in front of the robot. Observe how the robot response to the object.
Note:
1. The Maker Mini Sumo controller comes with an on-board LED indicator for each opponent sensor. When a sensor detects an object, the LED will light up.
2. The default sensing range for the opponent sensor is around 25cm. If you need to increase the sensing distance, you can adjust the potentiometer through the tiny hole on the object sensor.
Congratulations and well done that you're following us until this stage! In the next part, we will be discussing the game strategy and the sample program.
 International
 Singapore
 Malaysia
 Thailand
 Vietnam
